In 30 seconds
The class and who it suits
Ranger is a ranged bow fighter. This guide covers a PvE build: skills and specializations, stigmas, macros, Daevanion, Soul Binding gear, Magic Stones, Arcana, and how to understand pet breeds. It covers the path from your first skill points to a raid build.
A PvP build will come separately: PvP gear in Global has not yet been confirmed.
Your job in combat
How skills level up
You earn skill points from levels, quests, and Seal Dungeons; over time, there will be enough for everything. Skill points only raise a skill to level 10. Further levels come from:
| Source | Skill levels | How to get them |
|---|---|---|
| Skill points | up to 10 | levels, quests, dungeons |
| Daevanion boards | +4 | one node for each active skill on the Nezekan, Zikel, Vaizel, and Triniel boards |
| Rings | +2 | Soul Binding skill levels on two rings |
| Arcana | +4 | random skills on Arcana (more below) |
The maximum is 20. Skill level alone adds very little damage: the gain per level is tiny. Skills are leveled for their specializations:
| Skill level | Unlock |
|---|---|
| 8 | first specialization slot (options 1–3) |
| 12 | second slot and option 4 |
| 16 | option 5 |
| 20 | third slot |
Each threshold is a noticeable power spike. Since only a few skills can reach 20, each skill has its own target: 20, 16, or 12.
Skill leveling order
Spend points on active skills first, then passives.
Active skills, in order
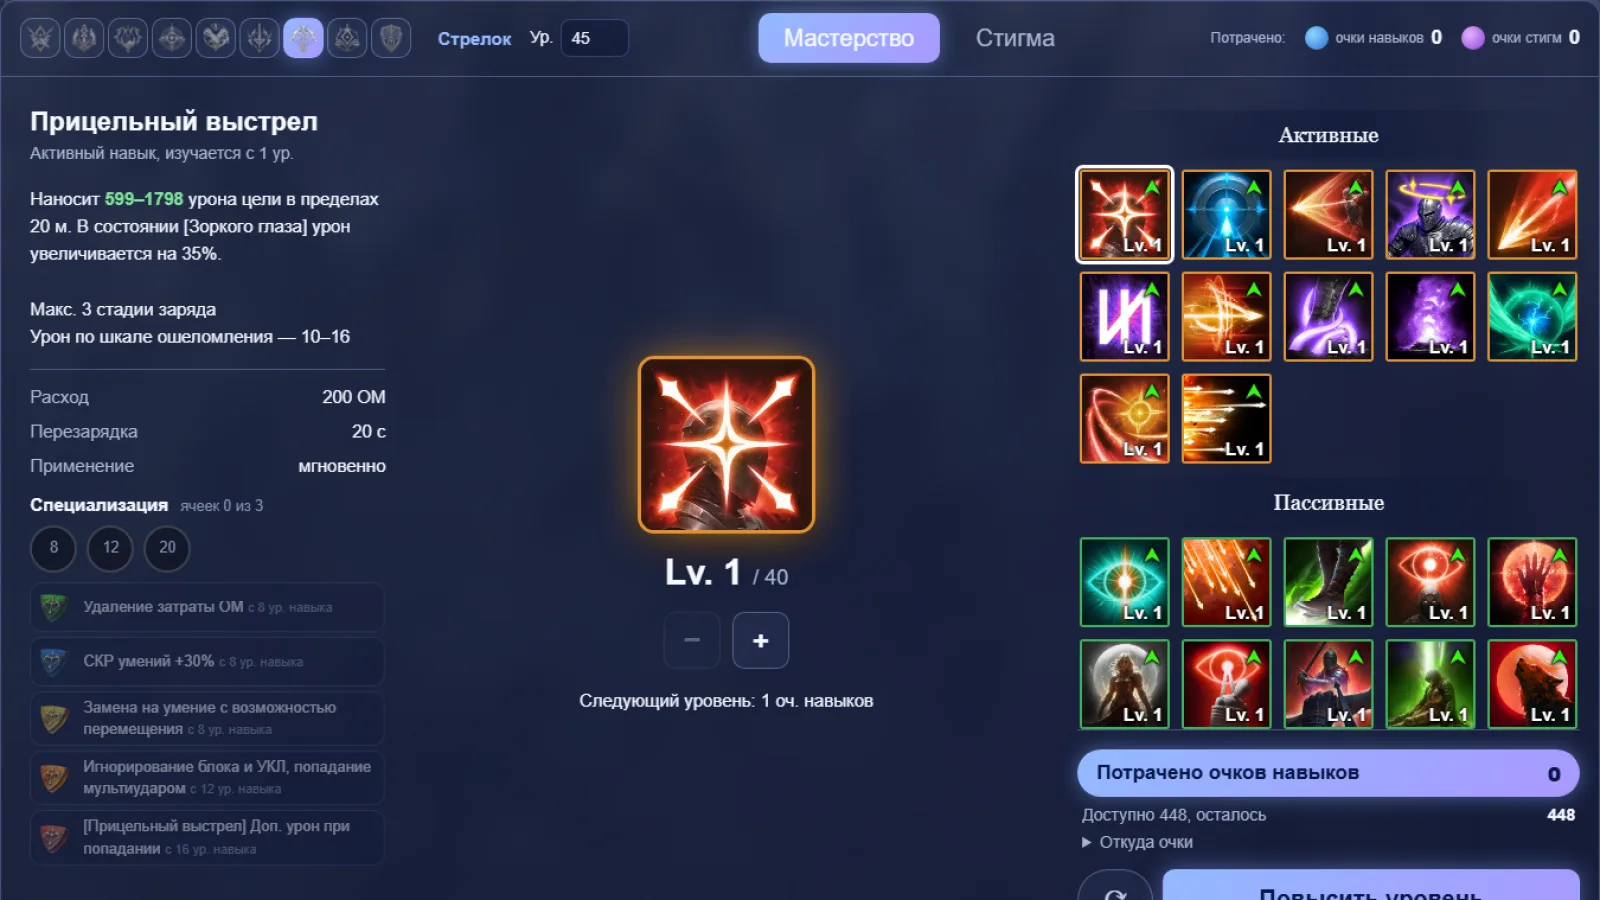
 Deadshot
 Gale Arrow
 Snipe
Snipe Drill Dart
 Tempest Shot
 Snare Shot
 Marking Shot
 Burst Arrow
 Defiance
Do not level these:
- Arrow Scattershot only works on a staggered boss, and even then the regular rotation deals more damage;
- Explosion Trap and Suppressing Arrow can stay at level 12 later: the trap is only for grouping small mobs in Transcendence Trials, while Suppressing Arrow is for PvP stuns.
Specializations: what to choose
The numbers are the options in the specialization window, from top to bottom.
Push to 20 — highest priority
DeadshotActive · CD 20s · level to 20Deals 599-1798 damage to a target within 20m. Increases damage by 35% if the caster has Precision. +30% Skill Speed
 Changes to mobile skill
 [Deadshot] grants extra damage on hit
Gale ArrowActive · CD 20s · level to 20Selects a target within 20m and deals 365-365 damage to up to 4 enemies within 4m of the target. Grants Gale to the caster for 10s.- Changes to mobile skill
 Increases Combat Speed, PvE Damage Boost, and PvP Damage Boost when less targets hit
- -10s cooldown
Up to 16, preferably 20
SnipeActive · level to 20Deals 47-47 damage to a target within 20m and restores 120 MP.- -1s [Deadshot] cooldown on hit
- Adds [Tempest Arrow] Chain Skill
- +50% Multi-Hit on hit
Drill DartActive · CD 5s · level to 16Selects a target within 20m and deals 112-112 damage to up to 4 enemies within 4m of the target and restores 100 MP on landing a Critical Hit. Inflicts Bleed on targets,…- +20% Skill Speed
- Activates [Drill Dart] 1 extra time
- Multi-Hit on hit
Tempest ShotActive · level to 16Selects a target within 20m and deals 56-56 damage to up to 4 enemies within 4m of the target.- Deals up to 12% more damage when less targets are hit
- +20% Skill Speed
Level 12 is enough
Snare ShotActive · CD 15s · level to 12Selects a target within 20m and deals 60-60 damage to up to 4 enemies within 4m of the target. Inflicts Slow, reducing Move Speed by -40% for 5s.- +20% Skill Speed
- Changes to mobile skill
Marking ShotActive · CD 10s · level to 12Deals 142-142 damage to a target within 20m. Moves the caster in the input direction and grants Precision for 10s. +5% Perfect Chance for the duration
- +5s duration
Burst ArrowActive · CD 20s · level to 12Selects a target afflicted with Slow or Root within 20m and deals 544-544 damage to up to 4 enemies within 4m of the target.- Changes to mobile skill
- Up to +20% damage when less targets hit
 Explosion TrapActive · CD 20s · level to 12Sets an explosive trap at the caster's location. The trap lasts for 10 seconds and deals 344-344 damage to up to 4 enemies within 5m when stepped on. Has a 40% chance to…
- Pulls enemies on explosion
- Extra damage after 3s on hit
 Suppressing ArrowActive · CD 20s · level to 12Deals 362-362 damage to a target within 20m with a 40% chance to inflict Stun for 3s while Precision is active.
- +50% Multi-Hit on hit
- +20% Skill Speed
DefianceActive · CD 60s · level to 12Removes Stun, Knockdown, Airborne, Grab, Frost, and Fear from the caster and grants Tenacity for 5s.- Restores 20% HP on using [Defiance]
- Restores 1000 Stamina on using [Defiance]
Leveling cheat sheet
Passive skills
Passive skills, in order
 Focused Eye
 Hunter's Resolve
 Hunter's Soul
 Concentrated Fire
 Rooting Eye
 Melee Fire
 Vigilant Eye
 Revitalization Contract
 Unyielding Resolve
 Wind Vigor
Top priorities
Focused EyePassiveIncreases the caster's Accuracy by 100, PvE Damage Boost by 1%, PvP Damage Boost by 0.5%, and Double Chance by 0.2%.First priority: Accuracy and damage escalation.Hunter's ResolvePassiveIncreases the caster's Critical Damage Boost by 6%.Second: Critical Damage escalation.Hunter's SoulPassiveHas a 50% chance to deal 344-344 damage on a Critical Hit.Take this third if you need another.These are the only truly important passive skills. After them, take the damage skills: Concentrated Fire, Rooting Eye, and Melee Fire. Then take Vigilant Eye (Max HP) and Revitalization Contract (restores HP when it drops to 10% or lower). Unyielding Resolve and Wind Vigor are nearly useless; level them last, when you have spare points.
Stigmas
At level 37, four stigma slots unlock. A fifth will likely open at 45; use it for Explosive Arrow.
PvE stigmas
 Vaizel's AuthorityStigma · CD 60s · level to 20Increases the caster's Attack by 20% for 10s.
 +10% Perfect Chance for the duration
- x1.5 [Focused Eye] effect for the duration
- x1.5 [Hunter's Soul] effect for the duration
- 50% chance to reduce all skill cooldowns by 1s on Critical Hit for the duration
 Bow of BlessingStigma · CD 120s · level to 20Increases the caster's Critical Hit by 200 and Accuracy by 100 for 10s.
- +50% Multi-Hit Chance for duration
- Increases Attack proportional to Critical Hit for the duration
- +20% Critical Damage Boost for the duration
- +7% Double Chance for the duration
 Supporting FireStigma · CD 90s · level to 20Summons an orb that provides supporting fire for 15s near the caster. The orb has a 25% chance to fire a shot dealing 243-243 damage and absorbing 1.5, 1.5% HP.
- +25% activation chance
- +15s duration
- -30s cooldown
- Critical Hit on hit
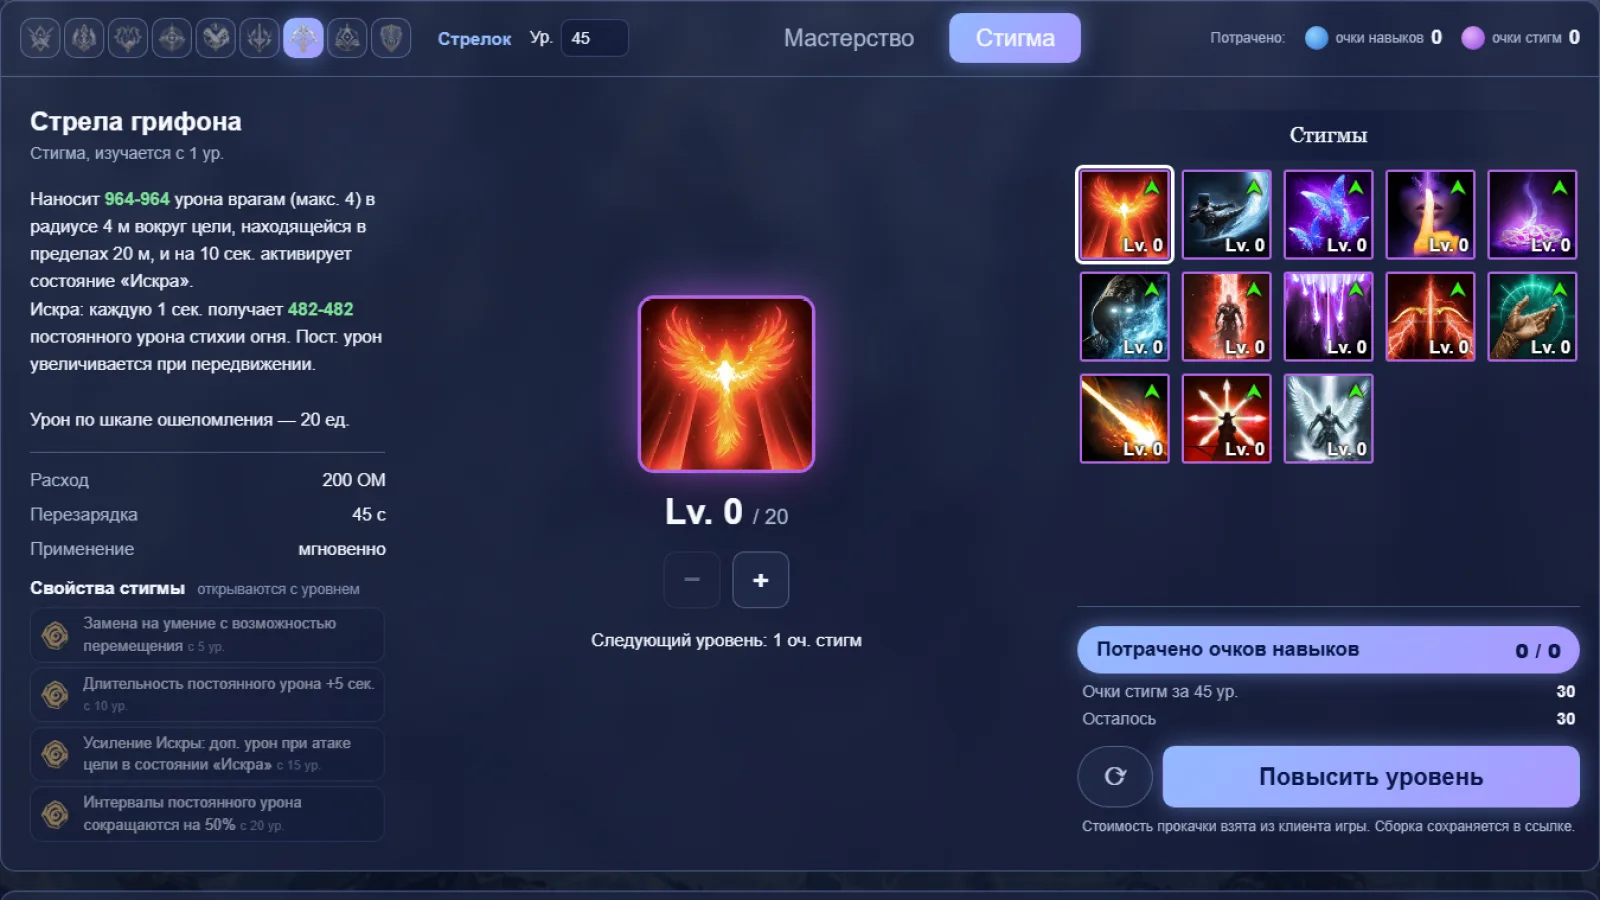
 Griffon ArrowStigma · CD 45s · level to 20Selects a target within 20m and deals 964-964 damage to up to 4 enemies within 4m. Inflicts Crimson Flames for 10s.
- Changes to mobile skill
- +5s Damage over Time duration
- Enhanced Crimson Flames - Extra damage when hit while afflicted with Crimson Flames
- -50% Damage over Time intervals
 Explosive ArrowStigma · CD 45s · level to 10Selects a target within 20m and deals 1426-1426 damage to up to 4 enemies within 4m. Increases damage by 20% to targets afflicted with Slow or Root.
- -15s cooldown
- +10% additional damage to targets afflicted with Slow or Root
- Critical Hit on hit
- +20% additional damage to targets afflicted with Slow or Root
Stigma effects unlock at levels 5, 10, 15, and 20, so level them evenly to the next breakpoint:
How to spend stigma points
- Step 1Take all four to 5, then all four to 10.
- Step 2As soon as you have enough points for Vaizel's Authority at 20, reset the stigmas and raise it to 20. This is when Ranger comes online.
- Step 3Level the rest evenly again: 5 → 10 → 15.
- Step 4Take Bow of Blessing to 20, then Supporting Fire to 20, then Griffon Arrow to 20.
- Step 5Keep Explosive Arrow at 5–10 until all four are at 20.
Rotation and macros
The in-game macro is enough for Ranger: two rows of skills:
- Create a macro and choose the slot where the first row starts—with Griffon Arrow.
- Add a second row starting from the Gale Arrow slot.
- Set the delay to 10 ms. Some players find a sweet spot between 10 and 20 ms; test what works for you, as it depends on your hardware and ping.
- Give Deadshot its own slot and bind it to a side mouse button.
- Assign the macro to the right mouse button (Settings → General → Macros). Mouse macros are limited in AION 1 control mode, so use the second control mode.
- Put Marking Shot on a separate, convenient key.
It is easier to activate buffs manually. Vaizel's Authority and Supporting Fire share a cooldown, so you can put them in the same slot.
Damage sequence
- Step 01 — buffsBow of Blessing, Supporting Fire, Vaizel's Authority.
- Step 02 — markMarking Shot.
- Step 03 — openerHold Deadshot until it is fully charged.
- Step 04 — damageHold the left and right mouse buttons; both macros will run.
- Step 05 — refreshWatch the mark on your effect bar. When less than 3 seconds remain, use Marking Shot again.
For more on delays and in-game macros, see the Skill Macros guide.
Daevanion
Daevanion is simpler than it looks: over time, you will have enough points for almost the whole board. The important part is the order in which you fill it.
Board priorities
- 1. Skills to 12Active skill nodes to unlock the second specialization slot: Deadshot, Snipe, and Gale Arrow.
- 2. Orange attack nodesThese are at the board corners. Pick up nearby skill nodes along the way: Burst Arrow, Drill Dart, Snare Shot, Tempest Shot, and Marking Shot. Take the shortest route; passive nodes can wait.
- 3. Remaining offenseAttack, Critical Hit, Focused Eye, and Hunter's Resolve.
- 4. Everything elsePassives and defense: Defense, HP, and Critical Hit Resistance.
- 5. LastReroute to collect as many Max MP +50 nodes as possible. Respecing the board is cheap.
| Board | Level | Orange nodes | Priority |
|---|---|---|---|
| Nezekan | 12 | Combat Speed ×2, cooldown reduction ×2 | all four first |
| Zikel | 20 | Damage Boost ×2, Damage Tolerance ×2 | Damage Boost first, Tolerance later |
| Vaizel | 30 | Critical Damage Boost ×2, Critical Damage Tolerance ×2 | Critical Damage first, Tolerance later |
| Triniel | 40 | Multi-Hit chance ×3, resistance to it ×3 | Multi-Hit first, resistance later |
| Azphel | 45 | PvP damage and tolerance | PvP only, Battle Crystals |
Each of the Nezekan, Zikel, Vaizel, and Triniel boards has one node for every active skill; together they add the +4 levels. On the second board, Deadshot and Snare Shot reach 12, a noticeable boost right away.
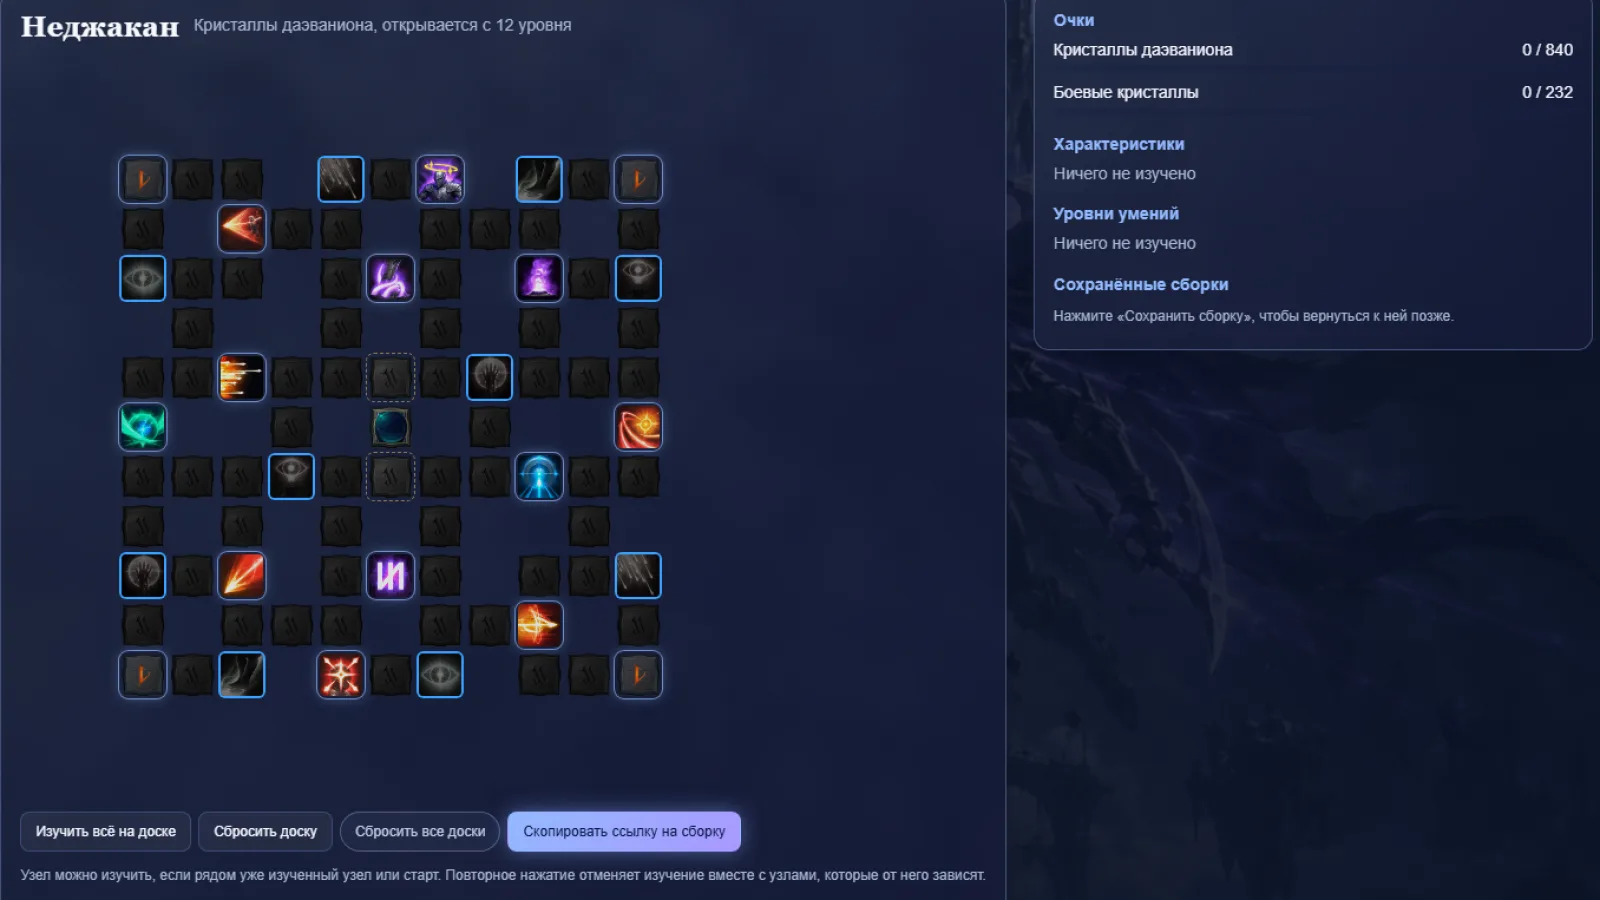
See every Ranger board node in Daevanion.
Gear and Soul Binding
Gear is simple: use items with the highest item level. The end-of-season goal is crafted weapons and accessories, Ludra bracelets, and dungeon armor (crafted armor for the maximum build). See the Stats guide for gear progression.
Do not reroll Soul Binding on armor. Replace a piece only when one drops with the line you need already on it. The first column matters most:
| Slot | Must have | Then |
|---|---|---|
| Weapon | Combat Speed, Weapon Damage Boost, Damage Boost, Might | crafted: +Multi-Hit; with Philosopher's Stone: Attack |
| Helmet | Double Chance, Attack Boost | Accuracy, Attack, or Critical Hit |
| Shoulders | Double Chance, Critical Damage Boost | Accuracy, Attack, or Critical Hit |
| Chest | Damage Boost | Accuracy, Attack, or Critical Hit |
| Legs | Attack Boost, Damage Tolerance | Accuracy, Attack, or Critical Hit |
| Mantle | Double Chance, Attack Boost | Accuracy, Attack, or Critical Hit |
| Gloves | Combat Speed | Accuracy, Attack, or Critical Hit |
| Shoes | Movement Speed | Accuracy, Attack, or Critical Hit |
| Earrings | Movement Speed, Might | Accuracy |
| Necklace | Combat Speed, Might | Accuracy |
| Rings | Deadshot, Gale Arrow | Snipe or Drill Dart only if they reach 20; otherwise Might |
Accuracy is the second most important stat
Without Accuracy, the boss blocks your attacks, and a blocked hit loses more than half its damage (about 70%). Attacks from behind cannot be blocked, which is why Assassins barely need Accuracy. Rangers do: Ludra has phases where you must attack from the front.
- In the Korean version, Ludra's Accuracy cap is about 1,300. Aim for at least 1,100–1,200; support (healer, enchanter) adds about +100, and their bonuses do not stack.
- Example: 671 Accuracy from Soul Binding + 370 from pet-breed insight = 1,041; add 13.8% from Precision and Freedom for about 1,200, then around +100 from support to reach 1,300.
- Do not worry about extra Accuracy: the cap will rise in season two. If you want to optimize season one, replace Accuracy with Focused Eye after reaching the cap.
Critical Hit works the same way: reach the cap. It is easier for Ranger because Marking Shot gives +300 Critical Hit and stays active. So for the fourth armor line, use whichever drops first—Attack or Critical Hit—and do not reroll one into the other. On crafted armor, get both. Once you have Focused Eye, it is worth about as much as +20 Attack.
Magic Stones
Use high-grade Magic Stones only on final gear; do not waste them hunting for yellow lines before then.
Best lines, in order
- 1. Front or rear damageRequires you to spend 80% of the time in that position. All stones must match the same direction. This is the Korean meta and the choice of top spenders; we do not recommend it in season one.
- 2. Attack 30Three yellow Attack lines.
- 3. Weapon Damage Boost, Damage Boost, Attack 20In that order.
- 4. Critical Damage Boost, Attack 10Also a good result.
One yellow Attack line (+10) is enough for most players; you can stop there. High Accuracy and Critical Hit values are also good, since you still need to reach their caps. 100 points on a line equals 1%.
Arcana
Arcana becomes important when you start farming Transcendence Trial stage four and hunting unique cards. It is another gear slot, providing stats and skill levels needed to reach 20.
| Arcana | Type | Purpose | Skills |
|---|---|---|---|
| Chalice | Time (Siel) | Combat Speed | any—wildcard |
| Parchment | Life (Yustiel) | HP; 2-piece set: +60 PvE Attack while HP is at least 70% | Snipe, Tempest Shot (+ Drill Dart, Burst Arrow) |
| Compass | Death (Triniel) or Freedom (Vaizel) | Critical Hit or Accuracy | Deadshot, Gale Arrow |
| Bell | Destruction (Zikel) | Attack | Hunter's Resolve only |
| Mirror | Wisdom (Lumiel) | Double Chance; set helps with MP | Focused Eye only |
The Compass type does not matter—choose the one with better skill rolls.
Goal: get a combined +4 to Deadshot and Gale Arrow from the Compass and Chalice. For example, if Deadshot rolls 2 on the Compass, you need at least 2 more on the Chalice. If it rolls 4 on the Compass, the Chalice is free for Snipe and Gale Arrow; this can get a third or even fourth skill to level 20. Tempest Shot needs at least 2 on Parchment to reach 16. It all depends on luck, so do not worry: in season two, you will probably need to rebuild Arcana anyway.
Synthesis. On the Chalice, choose Deadshot and Gale Arrow; the other two skills are random. On Parchment, choose Snipe and Tempest Shot. On Compass, choose Deadshot and Gale Arrow. On Bell, choose only Hunter's Resolve; on Mirror, only Focused Eye, as the second skill costs more and is unnecessary.
Upgrade. Feed unwanted cards as EXP. Each level increases a permanent stat and one random skill. The system may change soon to reduce some of the randomness.
Pet-breed insight
Stats are the same for Cogni, Wild, and Natura breeds, except for one slot on special pets. Rerolling unlocks at pet level 10. Locking each slot makes the next reroll more expensive, so secure the most important one first.
| Slot | What to look for | Good value |
|---|---|---|
| 4 (first!) | PvE Damage Boost (PvE only), Damage Boost (PvE and PvP), or Critical Damage (without optimization) | about 3.7 / 2.7; no lower than 3.5 / 2.5 |
| 1 and 5 | Max Attack (up to 20) is better than Additional Attack (up to 16) | Max Attack 18+, Additional Attack 15+ |
| 3, 6, 9 | Accuracy (up to 40) or Critical Hit (up to 30) | Accuracy 30+, Critical Hit 20+ |
| 2 and 8 | HP Increase (up to 2.4%) | 1.5–2 or higher; rerolls get expensive after that |
| 7 | any defensive stat | does not matter |
Max Attack is already good for Ranger in season one: the class has lots of Perfect Chance (10% from Vaizel's Authority, 5% from Marking Shot). While rolling slot 4, if slot 1 or 5 gets an excellent value, lock it. Ideally, lock slots 4, 1, and 5 in your first three locks. Accuracy and Critical Hit are interchangeable: high pet Accuracy lets you get Critical Hit or Focused Eye from Soul Binding instead.
For special pets, slot 4 should have Double Chance (at least 2.7). Skip front damage; 3% rear damage is worth keeping. Everything else is the same.
Common mistakes
- Leveling for damageSkill levels add little damage; level skills to 12, 16, and 20 for their specializations.
- Stopping at 17–19There are no breakpoints there: aim for 16 or 20.
- Uneven stigmasEffects unlock at 5, 10, 15, and 20. Level to breakpoints and take Vaizel's Authority to 20 first.
- Letting the mark expireWithout Marking Shot, you lose +300 Critical Hit and +35% Deadshot damage.
- Too little AccuracyThe boss blocks frontal hits, reducing damage by about 70%.
- Rerolling armorDo not reroll armor; replace it when a piece drops with the line you need.
Raid checklist
Ranger ready
- Deadshot and Gale Arrow are at 20 or on their way, with specializations set as above;
- Vaizel's Authority is at 20, and the other stigmas are evenly leveled to breakpoints;
- both macros are configured, with Deadshot on a side mouse button;
- Marking Shot stays up for the whole fight;
- Accuracy is around 1,100–1,200 or higher, and Critical Hit is at cap;
- orange offensive nodes are complete on every Daevanion board;
- rings have Deadshot and Gale Arrow.
The takeaway
Ranger revolves around Vaizel's Authority at 20, Deadshot and Gale Arrow at 20, an always-active Marking Shot, and enough Accuracy to reach the raid cap. Level skills for their specializations, stigmas to their breakpoints, and Daevanion from orange offensive nodes toward defense.
Comments